The instructions for building the original Squirrel may be found here: http://www.rubber-power.com/make-it.htm
I have always had trouble following directions. In model aeronautics I follow the principle, “Keep it simple, keep it light.” When I built my first Squirrel, I made some changes. I hope they are improvements. You can see them all in this picture.

1. I used a 1/8″ x 1/4″ stick. Even this is heavier than necessary.
2. That necessitated a 1/8″ x 1/8″ x 1/2″ shim block at the front end of the stick, so the Sig prop hanger would be a snug fit.
3. The stick tapers to 1/8″ thick in the last 2 3/8″ to make the tailplane parallel with the prop shaft. This helps the airplane climb under power and follow the propeller without fighting it.
4. The paper parts were cut out with cardboard templates. No scissors are necessary during construction. All wood parts are self locating on the paper patterns. No plans are necessary, as with the original. (Several sets of tissue parts can be made at one time by stacking several sheets of tissue on top of each other.)

The drawing gives the dimensions of the cardboard patterns. I use thin cardboard from cereal and cake boxes to make patterns.
5. There is no center rib in the wing. The hold down stick does that job. It is glued in two places, to the wing leading and trailing edge spars, not to the paper. I used harder wood for the hold down stick than for the rest of the sticks.
6. There is no wing saddle. The hold down stick straps directly to the top of the stick with two dental bands, doubled to make them pretty tight. The top ends of the hold down stick are sanded to 40 degree tapers to make it easier to roll the bands on.
7. The wing and tailplane papers were folded in half to make center line creases to locate the hold down stick on the wing and the tailplane on the fuselage.
8. 1/16″ square wood was used for the wing trailing edge, tip ribs and winglet spars. Grater strength is needed at the leading edge because lift is concentrated at the front of the wing, and the leading edge is what hits obstacles.
9. The winglet spars were located 3/4″ back from the leading edge. The primary function of the winglets is roll stabilization, but they also reduce tip losses, so the greatest height should be closer to the greatest pressure difference.
10. The wing was mounted with the paper on the upper surface, making a better airfoil. That gives the wing about 2 degrees of effective incidence. Added to the 3 degrees of downthrust, that is 5 degrees attack angle. This gives the wing better lift.
11. No wing incidence shim is necessary.
12. The winglet spars are glued to the outer faces of the wingtips, due to the wing being “upside down”,with the paper on top. The winglet paper is then glued to the inside of the spars.
13. The fin spar is extended 1/4″ below the bottom of the stick to hold the motor. You may file a round indentation in the back of the spar to hold the motor in place. With the motor I intend to use, the motor will never come loose, unless it gets into a thermal, and in that case your motor dethermalizer will come into play. With this extension, no toothpick or thread are necessary for the motor hook, simplifying construction.
14. The back corner of the tailplane paper aligns exactly with the end of the stick. The root chord of the fin is 1/8″ longer than the root chord of the tailplane so it too aligns exactly with the end of the stick, with the fin spar directly in front of the tailplane spar. The bottom edge of the fin paper aligns exactly with the bottom edge of the stick taper.
The finished plane weighs 5.9 grams. I used 11# wood for the stick and 14# wood for the spars. I also used a handmade Japanese Kozo paper that weighs 26 grams per square meter because the unsupported tissue edges seemed rather fragile in fine tissue. The distance between the hooks is 9 1/2″. I used a handy 20″ loop of 1/16″ Tan Super Sport to fly it.
It could be made quite a bit lighter with lighter wood, thinner tissue, maybe with thread reinforced edges, and a North Pacific 5 1/2″ prop assembly. That prop assembly weighs a gram less than the Sig unit because the prop is much thinner. Unfortunately NP has not manufactured props for years.
I moved the wing until I got a slow, steady descent in glide. The CG was at 13/16″, about a third of the chord, pretty close to the winglet spar position.
There are 18 parts in this Squirrel.
No., Dimensions, Description
1 1/8″ x 1/4″ x 12″ balsa motor stick
1 1/8″ x 1/8″ x 1/2″ balsa nose spacer
1 1/16″ x 1/8″ x 12″ balsa wing leading edge
1 1/16″ x 1/16″ x 12″ balsa wing trailing edge
4 1/16″ x 1/16″ x 2 1/16″ balsa wingtip ribs and winglet posts
1 1/16″ x 1/8″ x 2 1/2″ balsa fin spar
1 1/16″ x 1/8″ x 6″ balsa tailplane spar
1 1/16″ x 1/8″ x 3″ balsa wing hold down stick
1 tissue wing
1 tissue tailplane
1 tissue fin
2 dental hold down bands
1 5 1/2″ propeller assembly
1 19″ loop of 1/16″ rubber motor
Construction details may be seen in the pictures below.
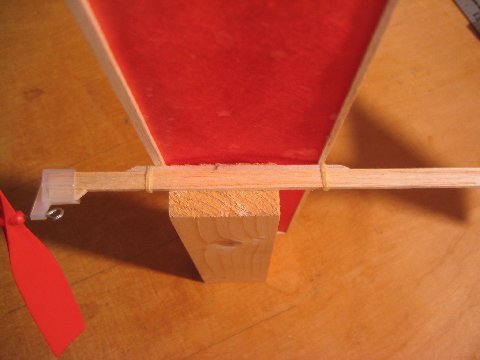
Close up of the front end showing nose block, wing mount, wing spars, CG mark. With the paper on top, there is no need for the shim block. The shim block gives 1.68 degrees of incidence to a -2 degree airfoil incidence, resulting in an effective -0.32 degrees incidence. This arrangement gives 2 degrees incidence. Add to those incidences the 3 degrees of down thrust to estimate attack angle. This gives good lift for a floaty flight.
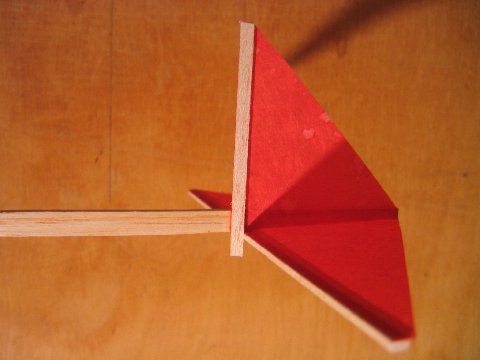
Close up of the tail showing fin spar extension as rear rubber hook, tapered motor stick and both papers located at rear end of stick with fin extending 1/8″ beyond tailplane. You can see the pencil mark for the end of the taper. I have since filed a semicircular notch in the hook post just below the tailplane. May not be necessary.
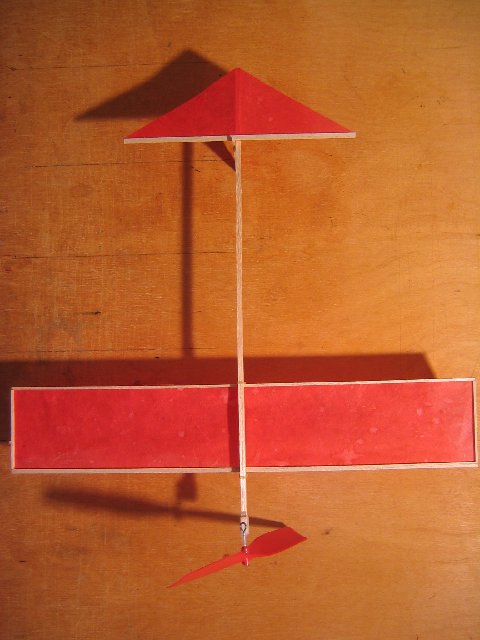
Bottom plan view showing smaller wing ribs and trailing edge. Tight dental bands will keep the wing from flopping around. This is a very light airplane. It glides very nicely, turning left.
Gary Hinze
(2009-07-20)
Would braiding the rubber motor help?
Yes.
Nice job! I have a AMA Cub ordered and I am ready to go!
Joe
the picture tells that the squirrel has light weight and strong frame work.
you made everything except the propeller.if you make the propeller also then the people should love it.the people can make the squirrel from home.so i requesting you to put some idea for making propeller from scrap.
by Prabhuraj.c.u
See “Simple Home Made Propellers and Bearings” in the “propellers” category. I recommend the Pennyplane propeller. The blade angle is adjustable and you can remove the blades if you need to replace the wing hold down rubber bands. You can cut the blades from plastic bottles. The paper tube hub is made by wrapping a strip of glue soaked paper around a waxed metal rod or tube.
Gary
See how to make your own propellers from scrap here:
http://www.easyairplanes.com/board/viewthread.php?tid=46&highlight=%E0%B9%83%E0%B8%9A%E0%B8%9E%E0%B8%B1%E0%B8%94
This is in Thai, but the pictures tell the story.